So your contractor just gave you the bad news. That bathroom you’ve been dreaming about? Yeah, it’s basically the size of a shoe box.
You’re standing there with your tape measure, staring at this tiny space, wondering how on earth you’re supposed to fit a toilet, sink, and shower without creating a human obstacle course.
Here’s the thing though: small doesn’t automatically mean terrible. I’ve seen enough cramped bathrooms (and accidentally elbowed enough walls while showering) to know that the real problem isn’t usually the size. It’s the layout. Get that right, and suddenly your closet-sized bathroom actually works.
I’ve pulled together 15 real bathroom floor plans that prove you can totally create a functional space even when you’re working with limited square footage. No magic required, just smart planning.
Compact Three-Fixture Layout with Linear Flow
This layout is efficiency at its finest, honestly. Everything lines up along two walls in a space that’s roughly 220 by 240 centimeters.
The bathtub runs along the longest wall, with the toilet and sink chilling on the wall next to it. There’s even a washing machine tucked in the corner opposite the tub, creating this nice triangular workflow.
Now here’s a detail that sounds boring but actually matters a ton: the door swing. It opens into the room without smacking into any fixtures. Trust me, starting your day by wrestling with a door that hits the toilet is not the vibe you want.
The measurements break down to 160 centimeters for the tub, 40 for the toilet area, and 20 for the sink section. What makes this whole setup work is that clear path down the center. You’re not doing some weird sideways shuffle between fixtures or playing bathroom Twister every morning.
The linear arrangement also keeps your plumbing runs simple, which means less money flying out of your wallet during installation. Always a plus.
Pro tip: If you’re working with similar dimensions, seriously think about where that door goes. Swinging into the vanity or toilet creates the kind of daily annoyance that’ll make you question all your life choices.
Accessible Design with Separate Shower and Closet
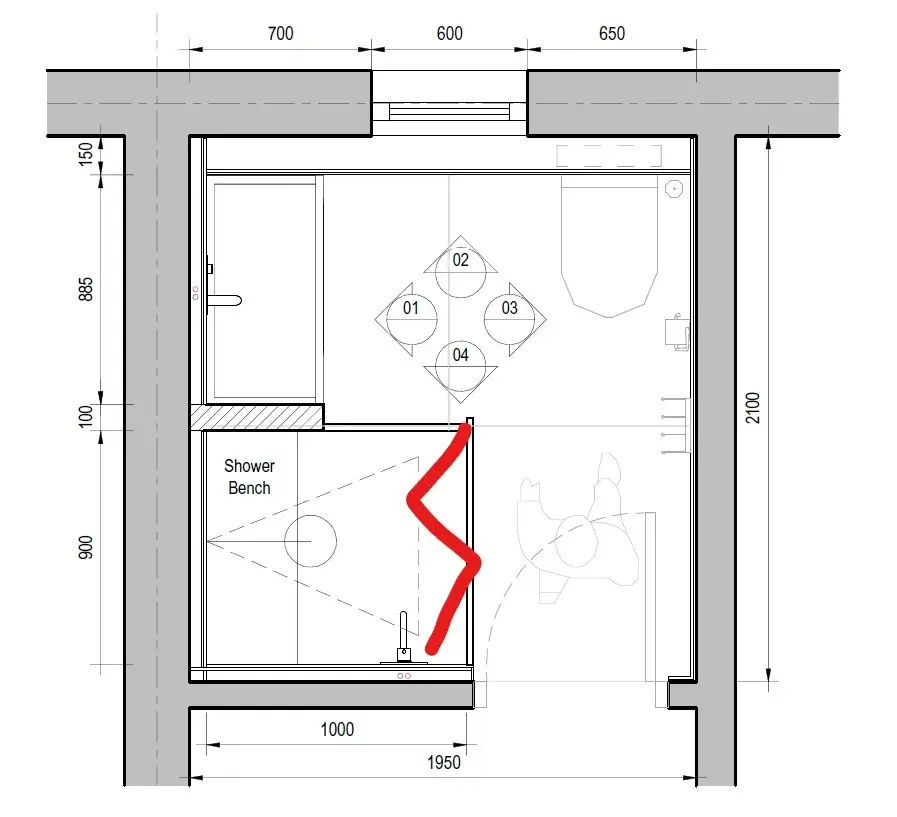
Who says accessible design has to look boring? This 2100 by 1950 millimeter plan proves it doesn’t.
The shower gets its own little room on the left side, complete with a bench seat. The main bathroom has different zones marked out for specific functions, with the toilet positioned on the right side.
Here’s what I really love about this one: the wet and dry zones are totally separated. The shower is basically in its own space, which means water isn’t spreading all over your bathroom floor like some kind of mini flood situation.
That bench isn’t just for accessibility either. It’s practical for literally anyone who’s ever tried to shave their legs while balancing on one foot like a flamingo. We’ve all been there.
Building codes aside, this layout teaches you something valuable about zoning. Even when your bathroom is small, creating distinct areas for different activities makes everything feel way more organized and intentional.
You’re not just cramming stuff into a room. You’re creating purpose-built spaces.
Corner Entry Layout for Narrow Spaces

Some bathrooms are basically hallways with plumbing. This 90 by 76 inch plan tackles that challenge head-on.
The tub runs along the back wall, the sink sits in the corner, and the toilet tucks in beside it. The door is positioned along the bottom wall, and one side backs up to another room.
The genius move here is that corner sink placement. Sounds weird at first, right? But it actually opens up the walking path way more than a traditional vanity would.
Every single inch in this layout serves a purpose. Nothing’s wasted. For narrow bathrooms, this approach works because it embraces the room’s actual shape instead of fighting against it.
You’re working with the proportions, not pretending you have a different space than you actually do.
Also Read: 10 Modern Bathroom Floor Tile Designs You’ll Want Now
Professional Construction Plan with Detailed Annotations
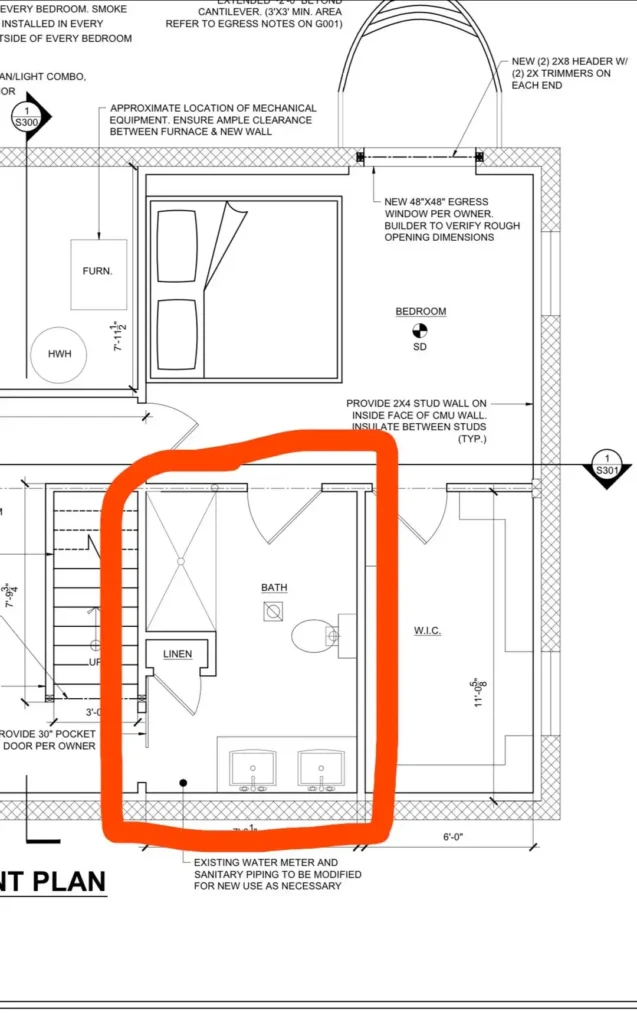
This architectural drawing shows what happens when design meets the real world. The bathroom layout includes furnace placement, water heater, and linen storage alongside your standard fixtures.
You get a builder’s perspective here with notes about mechanical equipment clearance, egress window requirements, and wall specifications. The bathroom itself has a standard three-fixture layout, but the context around it shows how bathrooms fit into bigger floor plans.
The linen closet sits right next to the bathroom, and all those detailed annotations tell you this is meant for actual construction, not just daydreaming.
What I appreciate about this example is the reality check it provides. Bathrooms don’t exist in some magical vacuum. You’ve got ductwork, plumbing lines, structural stuff, and code requirements that affect where fixtures can actually go.
Real talk: Those perfect layouts you see on Pinterest might not account for the water heater that can’t be moved or the floor joist running exactly where you wanted the toilet. This is why planning matters.
L-Shaped Layout with Extended Vanity Space
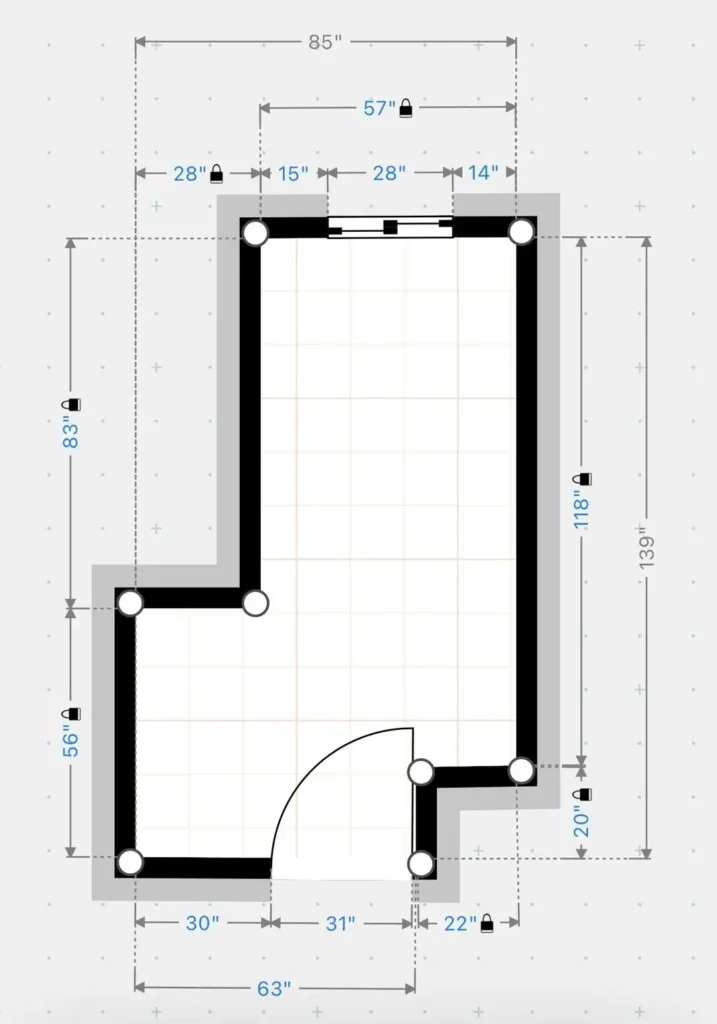
The L-shape creates opportunities that rectangular layouts just can’t match. This 139 by 85 inch plan shows you how.
Running 83 inches along one wall and 118 inches along the other, this layout carves out some serious counter space. The toilet sits in the lower left corner, a generous vanity area extends along the left wall, and there’s actual open floor space in the main area.
The measurements show 56 inches of depth on one side and 20 inches on the counter extension.
That extra counter space honestly changes how you use the bathroom. You’re not playing Jenga with your toothbrush and skincare products every morning. Everything has a spot.
The L-configuration also creates this natural separation between the toilet and the main bathroom area without needing walls or doors. Privacy without construction costs? Yes, please.
If your bathroom footprint allows for this shape, think about how that extended counter run could solve your storage headaches. Sometimes the best small bathroom layout maximizes horizontal surface area instead of just squishing fixtures into the smallest possible box.
Compact Commercial Layout with Shower Separation
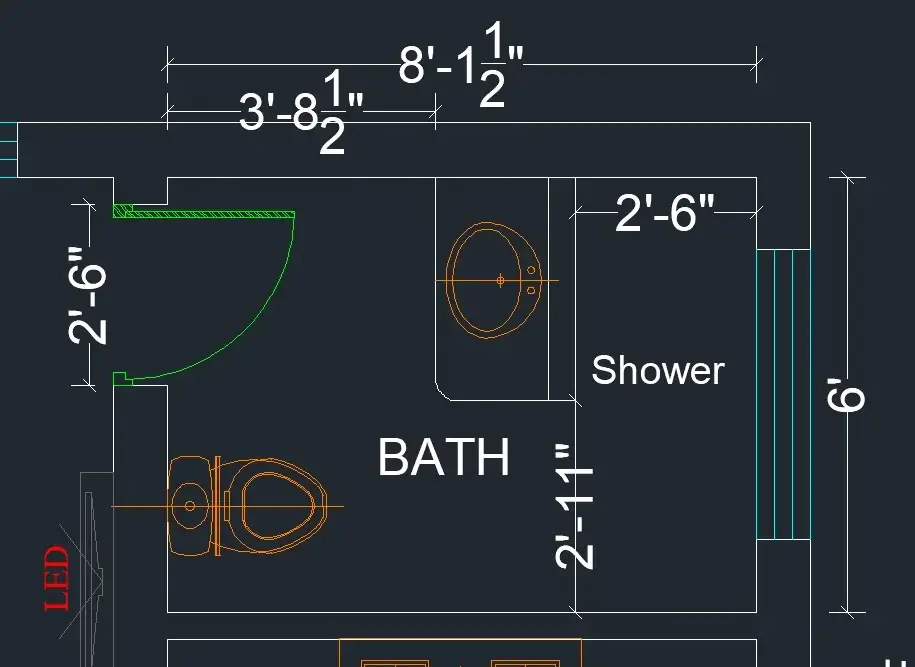
This plan measures approximately 8 feet by 9 feet and takes a totally different approach to fixture arrangement. The toilet and shower each get their own alcoves.
The toilet sits in its own 2-foot-6-inch nook on the left, while the shower occupies a similar space in the top right corner. The main floor space sits centered with about 2 feet of clearance in the middle section.
What strikes me about this layout is the emphasis on privacy and separation despite the compact size. Each fixture gets its own defined space instead of everything just opening into one big room.
This matters big time in shared bathrooms or commercial settings where multiple people need access. The trade-off is less open floor space, but you gain actual functional privacy.
It’s a design choice worth considering if multiple people regularly use the bathroom. Morning bathroom traffic jams are real, and this layout helps minimize them.
Also Read: Subway Tile Bathroom 8 Ideas That Actually Work in Real Homes
Square Footage Maximization in 27.4 Square Feet
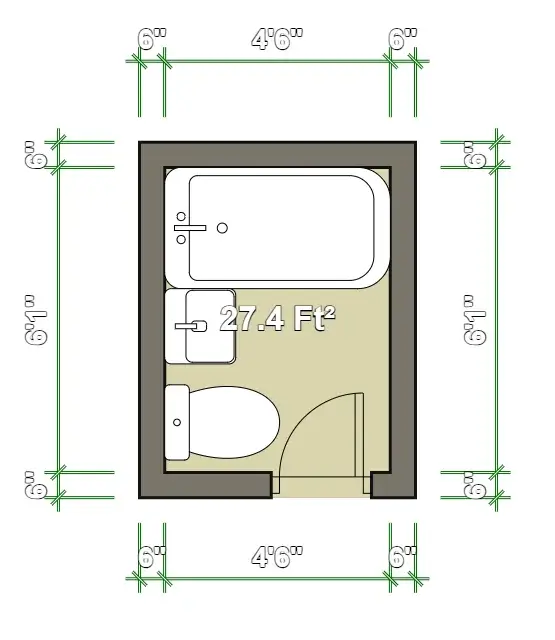
Fitting a bathroom into 27.4 square feet sounds basically impossible until you see someone actually pull it off. This 6-foot by 6-foot plan makes it work.
The layout stacks a tub along the top wall, toilet on the left, and sink on the right side. The room measures 4’6″ on each side in the interior space. The fixtures are compact but still full-size, proving you don’t need to buy tiny specialty products.
The key here is straight-line efficiency. The plumbing likely runs along one wall, which cuts down on costs and complexity. There’s just enough room to stand and move, but nothing extra.
For basement bathrooms, mother-in-law suites, or additions where space is seriously tight, this proves what’s actually possible. You won’t be doing yoga in here, but you’ll have a functional bathroom that meets code and does its job.
And honestly, that’s all you need sometimes.
Jack-and-Jill Bathroom with Dual Sinks
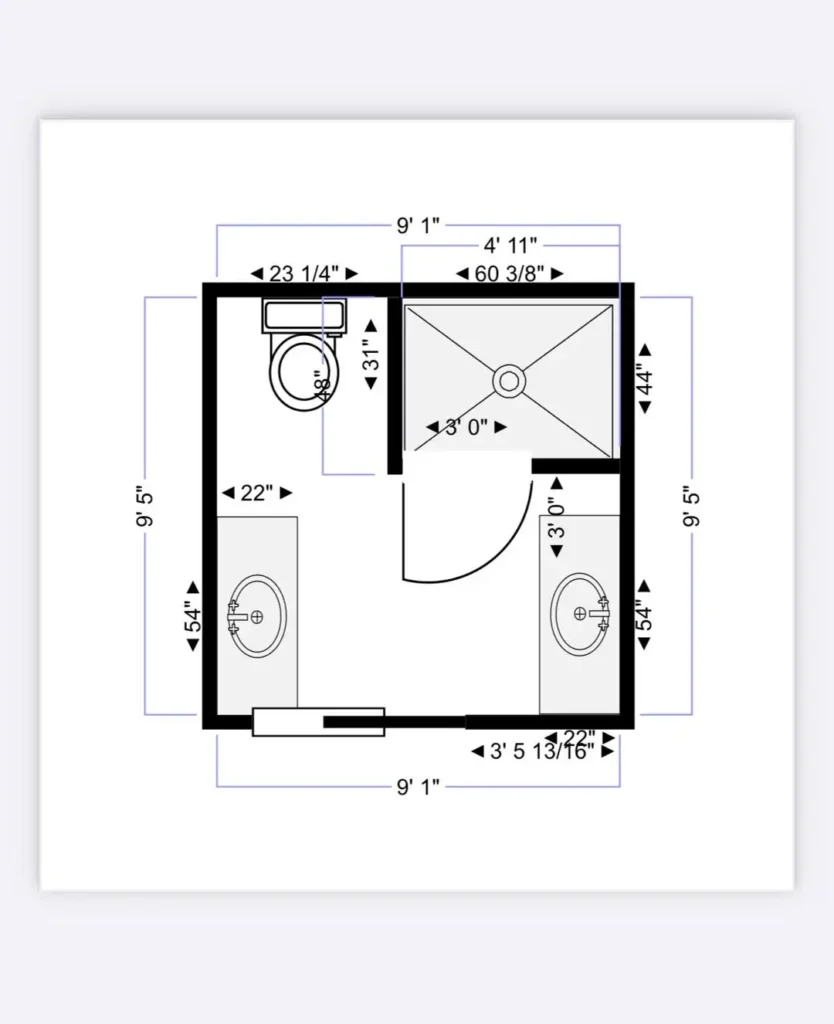
This 9-foot-1-inch square plan is designed for sharing. Two sinks, one toilet, one shower, and two entry points create a classic Jack-and-Jill layout.
The shower occupies the top right corner in a 3-foot square space. One sink sits on the left wall and another on the right wall, with the toilet in the lower left and entry points on both the left and bottom sides.
The floor plan shows clear 3-foot entry zones and careful spacing to meet accessibility requirements.
What this layout teaches you is the value of dual access when two bedrooms share a bathroom. Both people can access their sink without walking through the private areas where the toilet and shower are located.
You can brush your teeth while someone else is showering without creating an awkward “excuse me” situation every thirty seconds.
The challenge with Jack-and-Jill bathrooms is usually privacy and storage. Each person needs their own space for personal stuff, which this layout addresses by providing separate vanity areas.
Luxury Spa Layout with Freestanding Tub
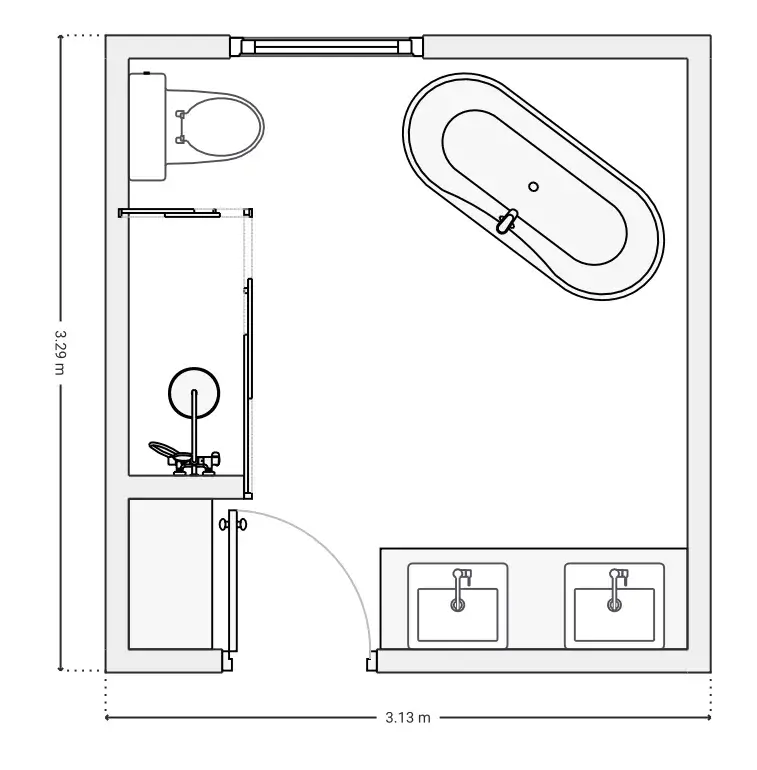
Not every small bathroom needs to cram in maximum fixtures. This 3.13-meter layout chooses luxury over quantity, and I’m here for it.
The design features a freestanding oval tub as the centerpiece, positioned in the upper right area. There’s a toilet in the upper left corner behind what looks like a privacy wall, a substantial vanity with storage along the left side, and dual sinks along the bottom wall.
The amount of open floor space here is notable. This layout actually breathes.
The trade-off is obvious: you’re dedicating significant space to that tub and the open area around it. But if a relaxing bath is important to you, this shows how to prioritize that experience even in a modestly sized room.
This approach works best when the bathroom serves a primary suite rather than being a shared family bathroom. It’s a lifestyle choice reflected in the floor plan, and there’s nothing wrong with that.
Also Read: Blue Tile Bathroom 11 Ideas That Actually Work (Straight From Real Homes)
Minimal Footprint Three-Fixture Plan
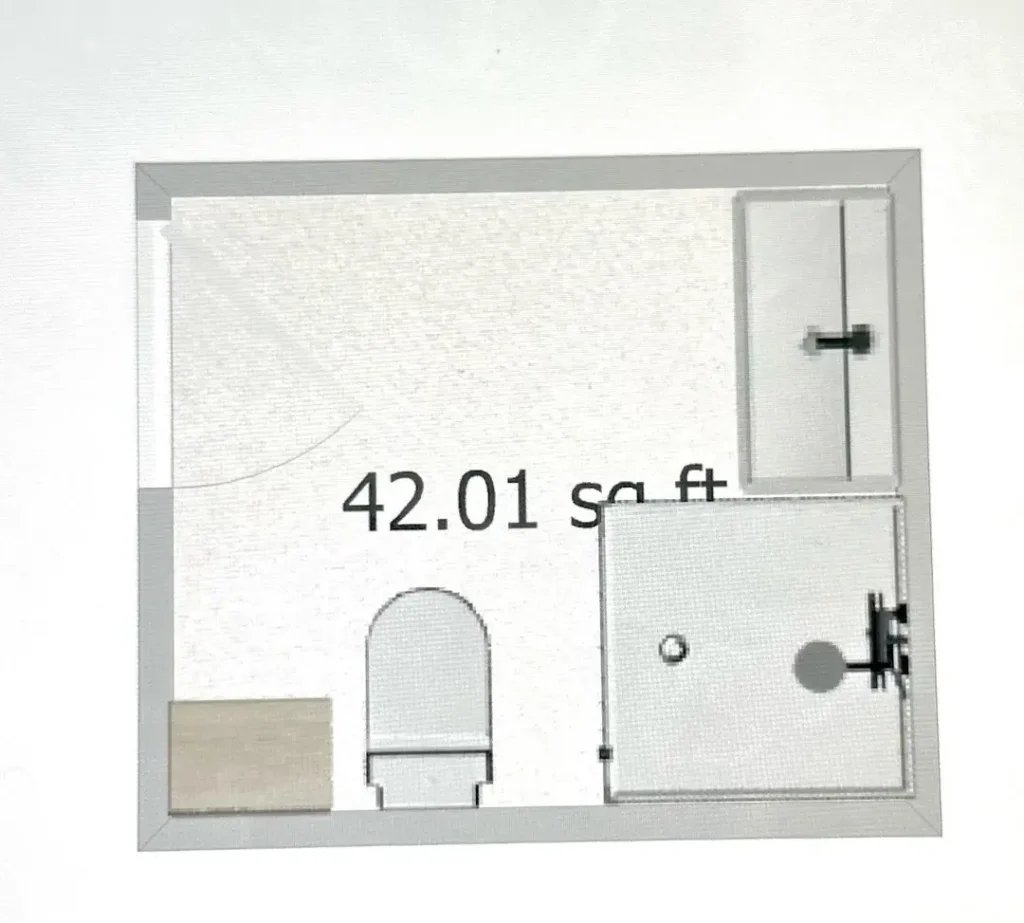
This layout reduces a bathroom to its essential elements in roughly 42 square feet. The fixtures cluster tightly but still maintain usability.
A small vanity sits in the lower left, the toilet occupies the center-left position, and a compact shower fills the upper right corner. The 3D modeling shows the spatial relationships more clearly than a flat floor plan would. The door enters from the upper left, swinging into the room.
The tight clustering here is totally intentional. By keeping everything close, the plumbing stays simplified and the remaining space stays open. There’s no wasted corridor or dead corner serving zero purpose.
For powder rooms, guest bathrooms, or anywhere you need basic facilities without extra space, this demonstrates the minimum viable bathroom.
Everything works, nothing’s missing, and you haven’t paid for square footage you don’t actually need.
Detailed Design with Multiple Layout Views
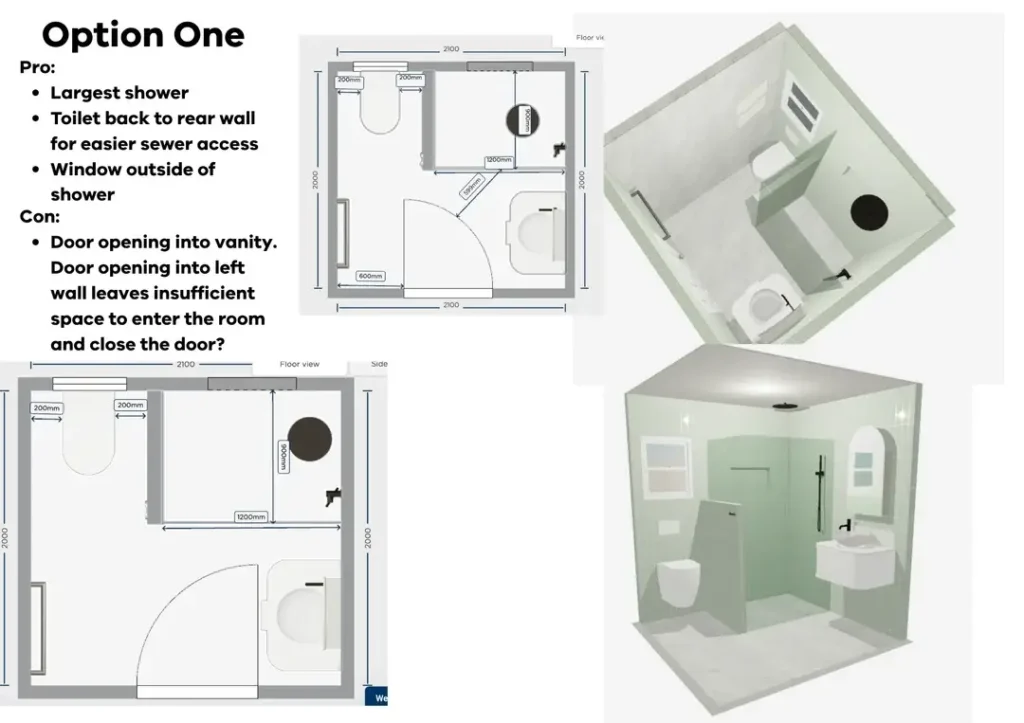
Professional planning often includes multiple perspectives. This example provides both floor plan and 3D renderings of a 2100 by 2000 millimeter bathroom.
The floor plan shows a toilet positioned against the rear wall for optimal sewer access. You get both plan view and 3D visualization showing how the space actually looks when built.
The shower fits in one corner, the vanity runs along one wall, and the layout includes window placement outside the shower area. That’s a detail affecting both privacy and ventilation.
What the multiple views reveal is how decisions look on paper versus in actual reality. That window location, for instance, provides natural light without creating privacy concerns during shower time.
The 3D view shows the actual sight lines and how the space feels, not just how it measures.
When planning your own bathroom, creating or requesting 3D views helps you catch issues before construction starts. You might realize the toilet is visible from the door or the shower feels way more cramped than you expected. Better to find out now than after you’ve already spent the money.
Master Bathroom with Built-In Storage

This approximately 12-foot square layout makes storage a primary design element. A two-sliding-door wardrobe runs along the entire top wall, which is pretty genius IMO.
The bathtub stretches along the left side with 162 inches of length. The toilet sits in the lower right corner, and there’s a rectangular shower on the right side. Dual sinks run along the bottom wall.
The measurements show careful attention to clearances, with specific distances noted between all fixtures.
That wardrobe integration is the standout feature here. Instead of building a separate closet, the storage becomes part of the bathroom itself. This works particularly well in master suites where you’re getting dressed in the bathroom anyway.
The challenge with this approach? Moisture management. Wardrobe contents and humid bathroom air aren’t exactly best friends. Proper ventilation becomes essential, not optional.
Nobody wants their clothes smelling like shower steam and soap.
Galley-Style Bathroom with Tub Emphasis
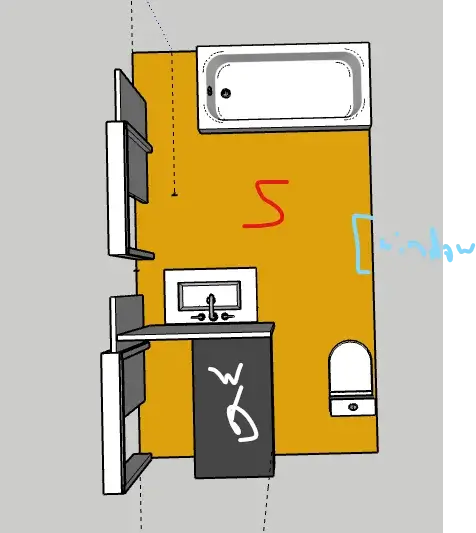
Long and narrow defines this layout. The space stretches vertically with the tub eating up the upper portion.
A standard tub spans the width at the top, with the vanity and storage positioned along the left wall. The bold orange floor space indicates the walking area, and the toilet sits in the lower right corner.
The galley approach works when your space is shaped like a hallway. You’re basically creating two walls of function with a path between them.
It’s not the most spacious feeling, but at least it’s honest about the room’s proportions. No pretending here.
This layout type often shows up in older homes where bathrooms got shoved into existing floor plans without ideal dimensions. You work with what you have, and this makes the most of it.
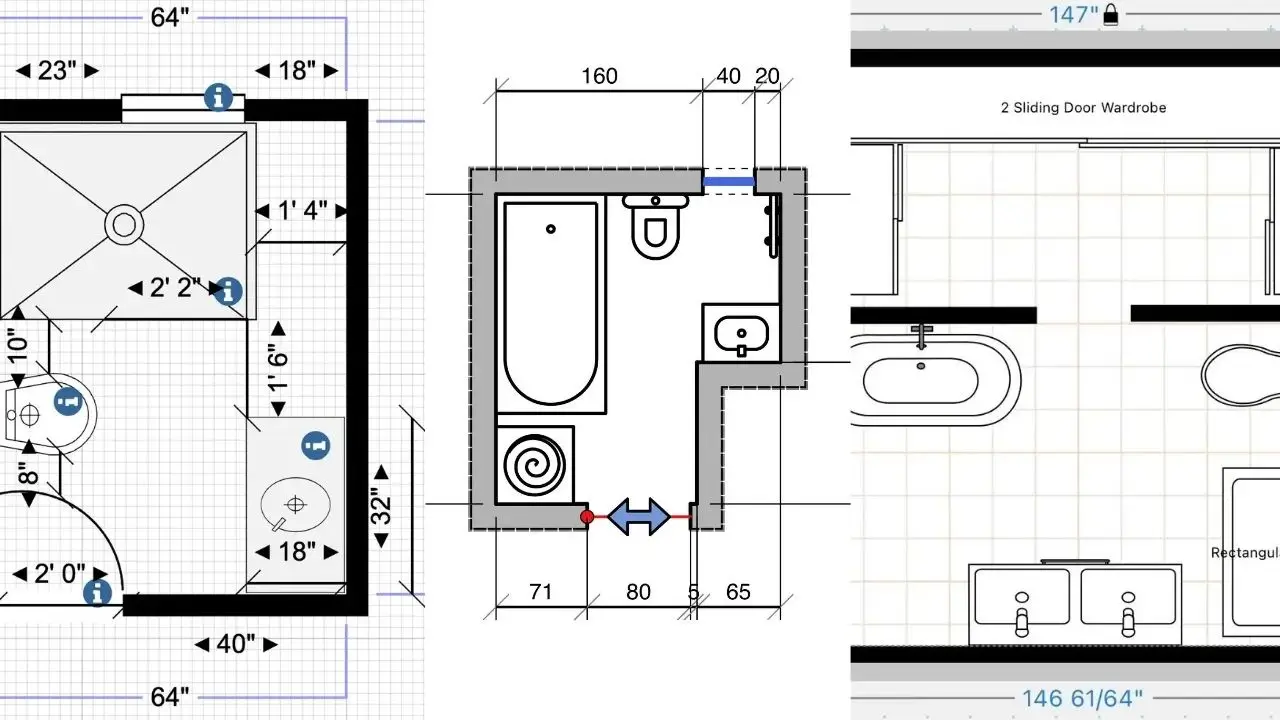
ADA-Compliant Layout with Specific Measurements
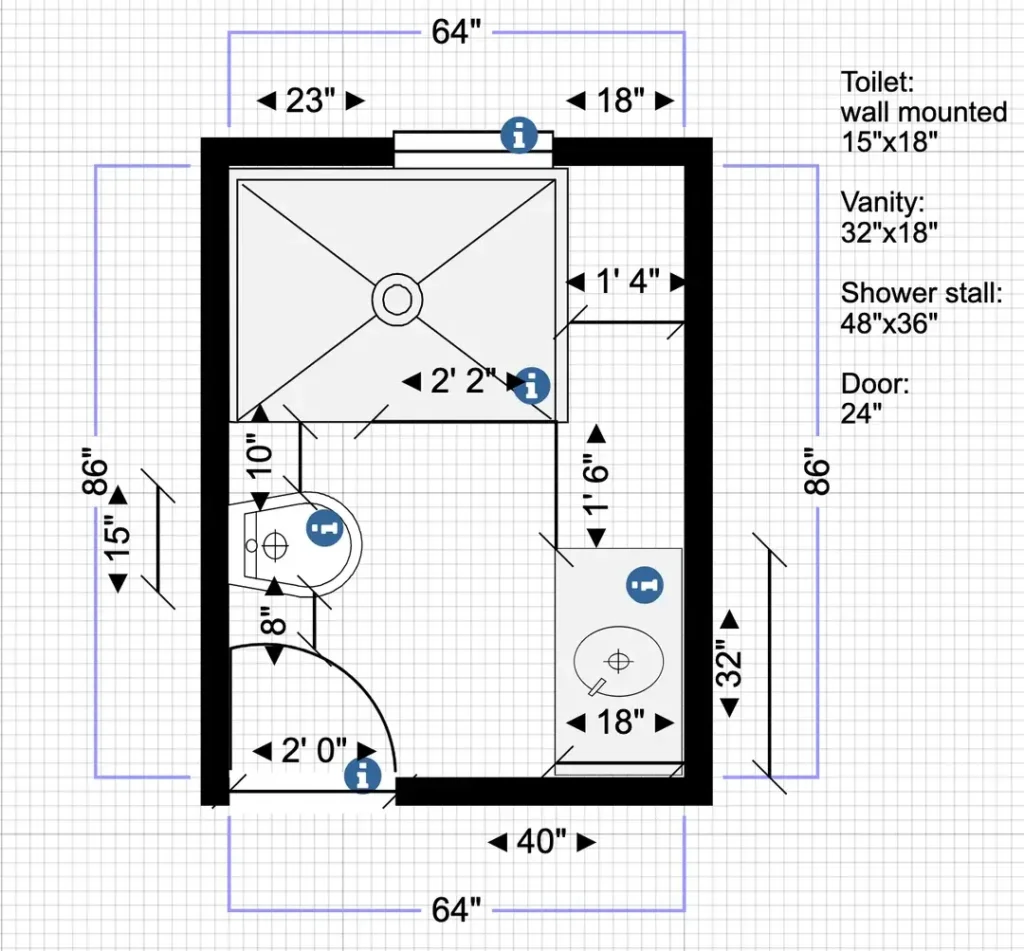
Accessibility requirements create specific design constraints. This 64-inch square layout meets those standards while staying compact.
The shower stall occupies 48 by 36 inches in the upper right area. Every measurement is detailed: the wall-mounted toilet at 15 by 18 inches, the 32 by 18 inch vanity, and the 24-inch door.
Information icons mark key accessibility features. The plan shows 2-foot clearances where needed and careful attention to turning radius.
Here’s the thing: building to ADA standards creates bathrooms that work better for everyone, not just people with mobility challenges. That extra maneuvering space makes the bathroom easier to clean, less claustrophobic, and more functional for anyone carrying a child or dealing with a temporary injury.
The measurements here aren’t suggestions. They’re requirements. But they’re also proof that accessible doesn’t mean oversized. This fits into the same footprint as many standard bathrooms.
Mirror-Image Dual Bathroom Layout
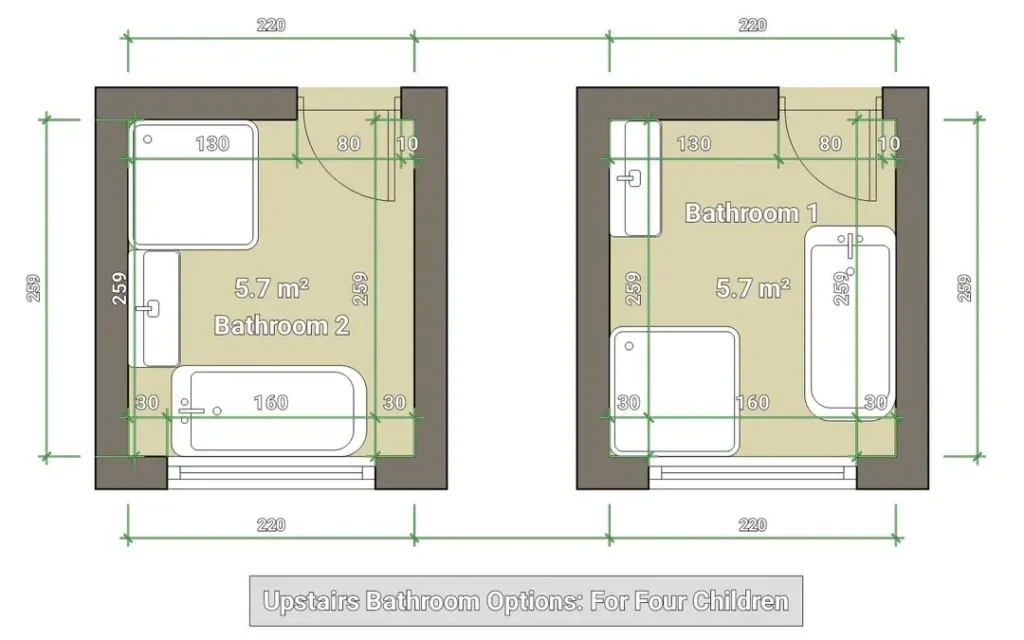
Sometimes you need two identical bathrooms side by side. This plan shows both at 220 by 259 centimeters each, designed for an upstairs serving four children.
Each bathroom contains the same fixtures: a 160-centimeter tub along the bottom wall, an 80-centimeter vanity section, and a toilet. These are created as mirror images, with Bathroom 1 showing the toilet on the right side and Bathroom 2 showing it on the left side.
The beige floor area indicates usable space, and the green measurement lines show precise dimensions.
This symmetrical approach makes construction way more efficient. The plumbing can be shared between the two rooms, and builders can repeat the same process twice instead of learning two different layouts.
For families with multiple kids or multi-generational households, providing separate bathrooms reduces those morning bathroom wars. These aren’t large or luxurious, but they’re complete and private. Sometimes that’s exactly what you need.
Comparing Layout Approaches
Different spaces demand different solutions. Here’s how these layouts compare:
| Layout Type | Best For | Complexity | Space Required |
|---|---|---|---|
| Linear Three-Fixture | Standard rectangular rooms | Easy | 48-60 sq ft |
| L-Shaped with Extended Counter | Corner locations, storage needs | Medium | 65-75 sq ft |
| Jack-and-Jill Dual Access | Shared between two bedrooms | Medium | 80-90 sq ft |
| Galley Style | Narrow spaces, limited width | Easy | 45-55 sq ft |
| ADA-Compliant | Accessibility requirements | Advanced | 40-45 sq ft |
Making Your Layout Decision
The right small bathroom layout depends on way more than just measurements. Think about how many people use the space and when they use it.
A single-user bathroom can sacrifice some circulation space for extra storage or a bigger shower. A family bathroom needs clearances that let multiple people move through efficiently, even if that means smaller fixtures.
Think about your actual routine. Do you spend serious time getting ready at the vanity? You need counter space. Is a relaxing bath important to you? The tub becomes the priority.
Code requirements aren’t optional, FYI. Minimum clearances exist for legit good reasons, and trying to cheat these dimensions creates a bathroom that’ll frustrate you daily.
Most codes require:
• 15 inches from the toilet center to any wall or fixture
• At least 21 inches of clear space in front of the toilet
• Sufficient door clearance
Check your local requirements before finalizing any plan. Seriously.
Plumbing location affects cost big time. Keeping your new fixtures on the same wall as existing plumbing saves money compared to relocating drains and supply lines. Sometimes the “perfect” layout costs thousands more than a good-enough layout that works with your existing infrastructure.
Choose wisely.
Final Thoughts on Small Bathroom Planning
Small bathroom layout floor plan ideas aren’t about finding the one magical perfect solution. They’re about understanding what’s possible and what actually matters to you.
I’ve shown you everything from tiny 27-square-foot plans to more generous 90-square-foot layouts with luxury features. The common thread? Intentionality.
Every successful small bathroom makes conscious choices about what to include and what to skip. Your bathroom doesn’t need everything. It needs the right things arranged in a way that works for your daily life.
Start with your must-haves, measure your space accurately, and choose a layout that prioritizes your actual needs over theoretical ideals.
The best bathroom floor plan is the one you’ll still appreciate five years from now when you’re brushing your teeth on some random Tuesday morning, half-asleep, and everything just works without you having to think about it.
That’s the goal. Make it happen.