Your walls are basically the biggest blank canvas in your home, and most people just… leave them blank. Or worse, they hang one sad piece of art in the middle of a giant wall and call it a day. 😅
I get it though. Finding wall decor that doesn’t look cheap, doesn’t cost a fortune, and actually feels you is weirdly hard. So instead of showing you stuff from some overpriced home decor store, I pulled together 10 real DIY wall decor ideas that real people built, crafted, and hung in their actual homes.
Some of these take a whole weekend. Some take an afternoon. A few cost less than your last coffee order. All of them look genuinely impressive.
Let’s get into it.
Paper Hexagon Flower Wall Hanging That Costs Almost Nothing
Most paper crafts look amazing in tutorial photos and then deeply disappointing in real life. This one is a rare exception.
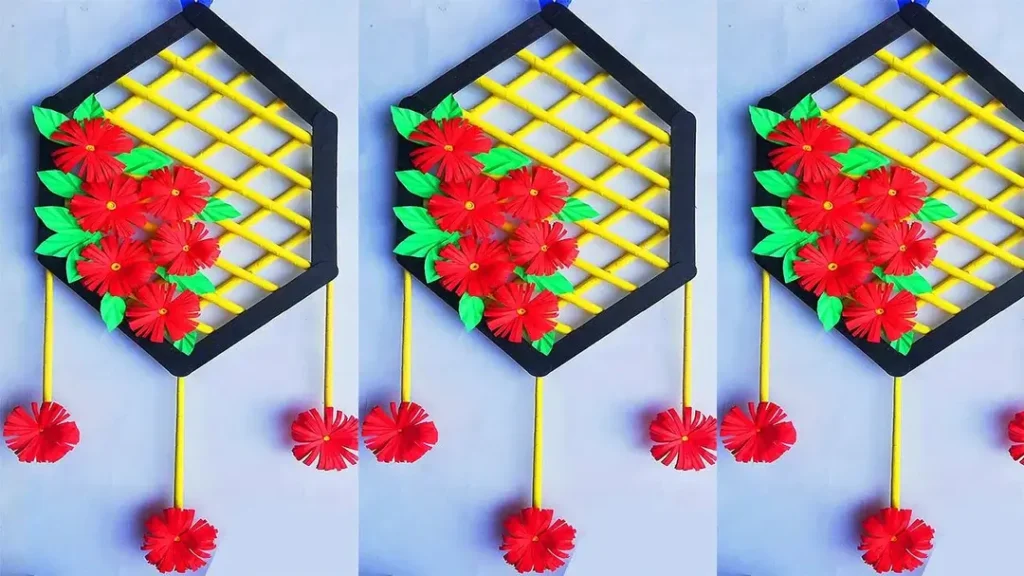
Reddit user r/arslanshan built this piece using a black hexagonal frame made from craft foam or thick cardboard, with yellow paper straws woven in a diagonal grid across the inside. Hand-cut red paper flowers are layered over the lattice, green paper leaves are tucked between the blooms, and three dangling straw stems with smaller flowers hang from the bottom.
What makes it work is the contrast. Bold black frame, bright yellow straws, vivid red flowers, clean green leaves. It has a graphic, intentional quality that most paper crafts totally miss.
Here’s how to pull it off:
- Cut your hexagon from thick cardboard and paint it black
- Use actual paper straws for the lattice grid (they hold shape better than regular drinking straws)
- Search “fringe paper flower tutorial” and cut your petals longer than you think you need
- Layer 5 to 7 flowers of slightly different sizes across the bottom two-thirds of the frame
- Let the arrangement be a little asymmetrical. That’s what makes it look natural instead of stiff
This works beautifully in a bedroom, nursery, or anywhere you want to add color without committing to painting a wall.
Comic Book Fandom Wall with a Bold Circular Statement Piece
Some people decorate their walls. Others build shrines to the things they love. Honestly? The shrine approach usually produces better results.
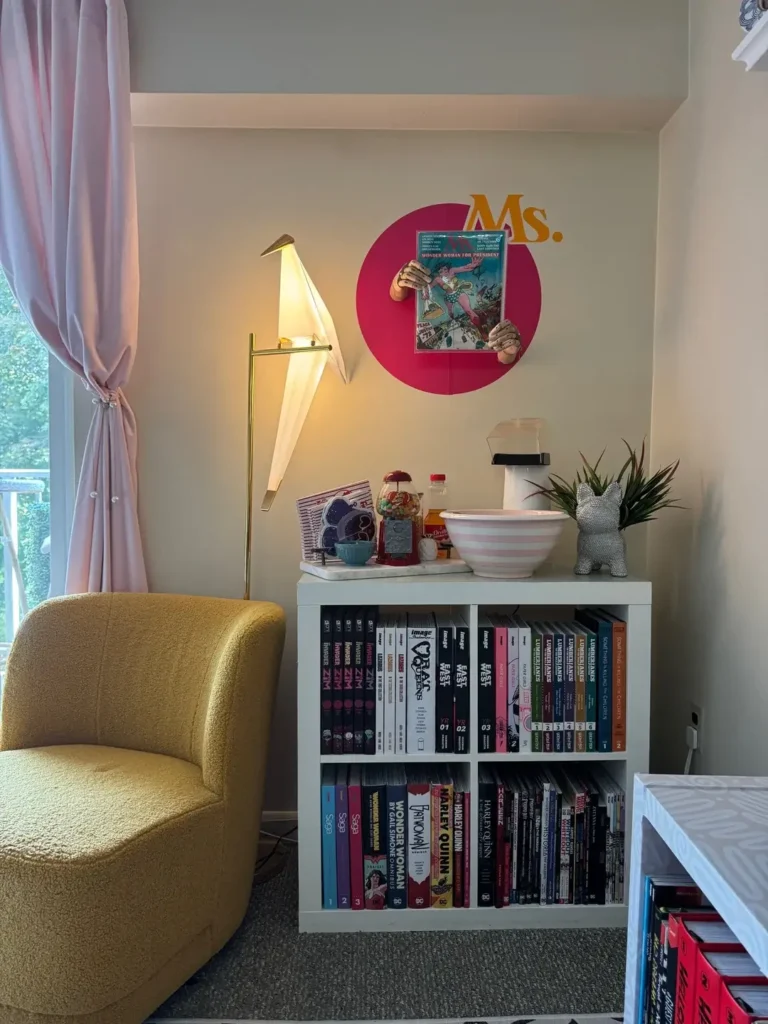
Reddit user r/lehmongeloh mounted a large hot-pink circle directly onto a neutral wall, then centered a framed Wonder Woman for President comic cover on it, with a bold gold “Ms.” sign extending to the right. Below it sits a white bookshelf packed with graphic novels, a brass origami bird floor lamp on one side, and pink curtains framing a nearby window.
The circle is the genius move here. It acts like a painted accent without you ever touching a paint roller. A large circle of foam board or poster board painted in a saturated color gives any piece of wall art a focal point it wouldn’t otherwise have.
The yellow armchair in the setup balances all that pink perfectly, and the bookshelf becomes part of the wall decor because the spines are colorful and deliberately organized.
If you want to try this approach:
- Pick one interest, whether that’s music, film, comics, or a specific era
- Build the wall around a single hero piece
- Let everything else support that focal point instead of competing with it
The restraint of choosing one focal point is what separates this from a cluttered fan display. Sounds simple, but most people skip this step.
Vinyl Record Album Art Wall as Functional Living Room Art
Here’s the thing about vinyl collections. Storing them in crates means you forget they exist. Putting them on the wall means every single cover becomes a design choice.
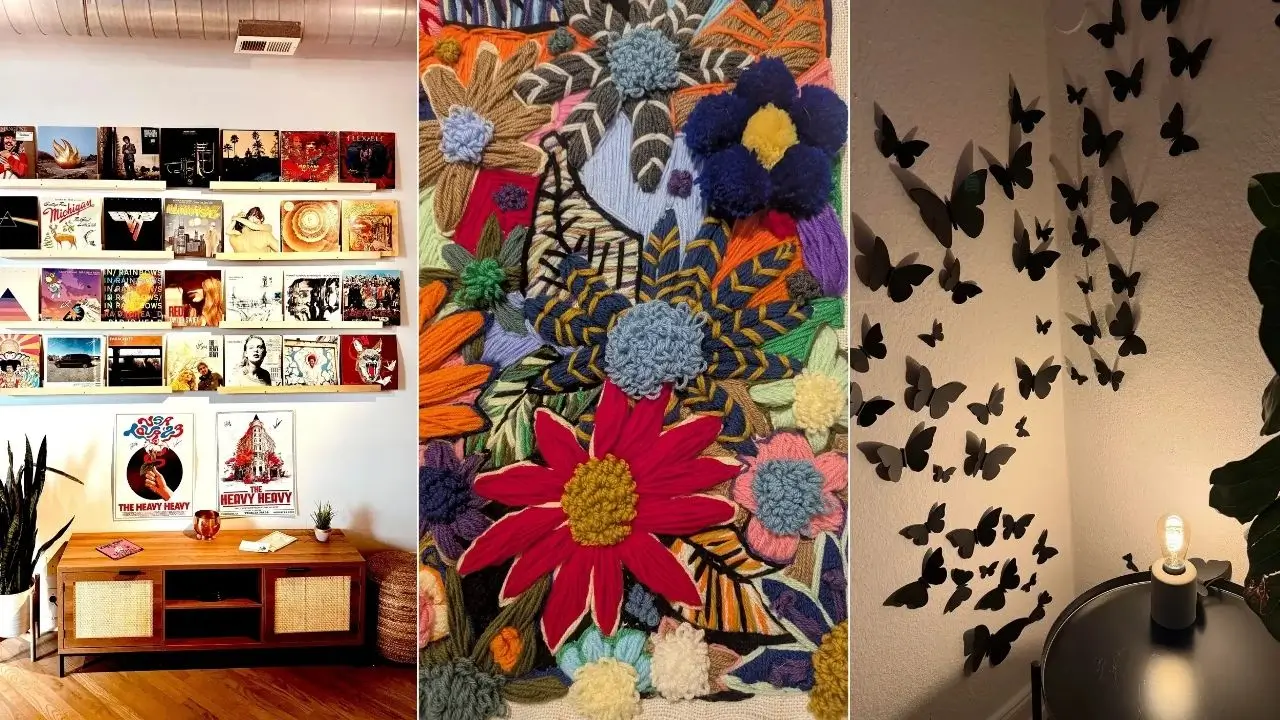
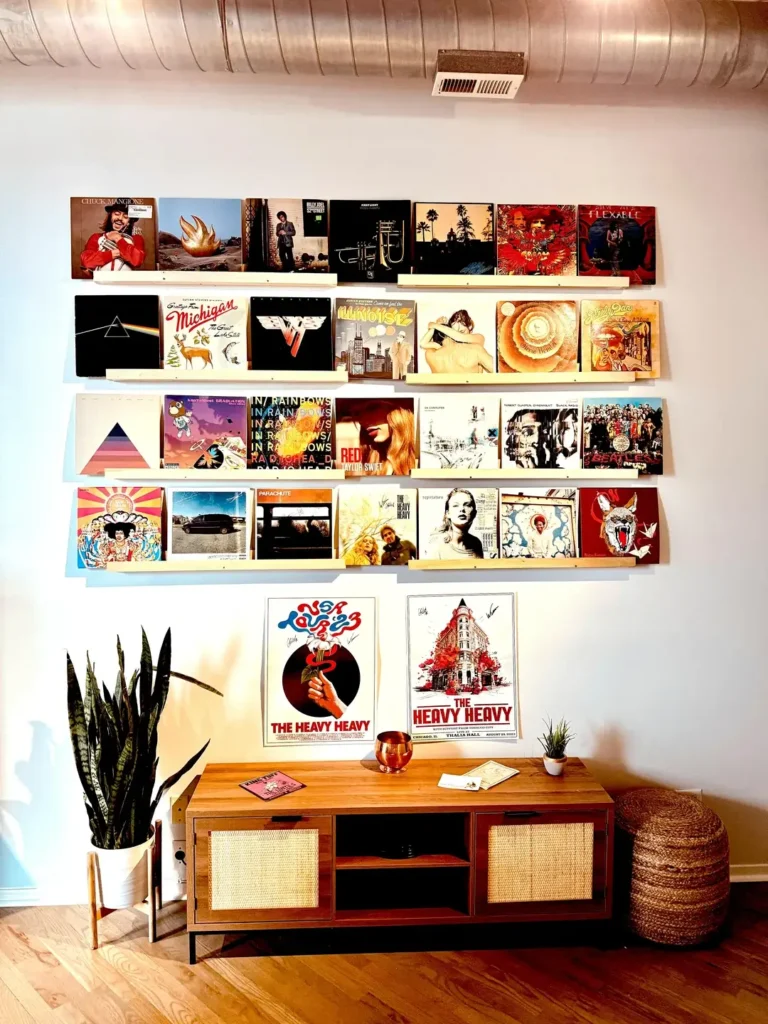
Reddit user r/IddyBiddyChuck mounted four long shallow ledge shelves across the upper portion of a white wall, displaying around 28 to 30 records standing upright with their album art facing out. Pink Floyd, Van Halen, Radiohead, Taylor Swift, the Beatles, and Jimi Hendrix are all visible. Below the shelves, two framed concert posters hang on either side of a walnut media console with rattan-panel doors. A snake plant anchors the left corner, and a woven rattan pouf sits to the right.
Album covers are designed by professional artists and photographers. Displaying them is literally curating a graphic art collection that you can rotate any time you feel like a change. That’s a pretty sweet deal.
The shelves here look like the IKEA Mosslanda picture ledge, which runs about $15 each. A few tips:
Use the media console or furniture below to tie the whole wall together with warm tones
Space the shelves roughly 12 inches apart so records don’t overlap awkwardly
Add framed concert posters below for a personal visual anchor
Also Read: 8 Hallway Wall Decor Ideas That Actually Work (Real Homes, Real Results)
Geometric Triangle Shelves Arranged as Wall Sculpture
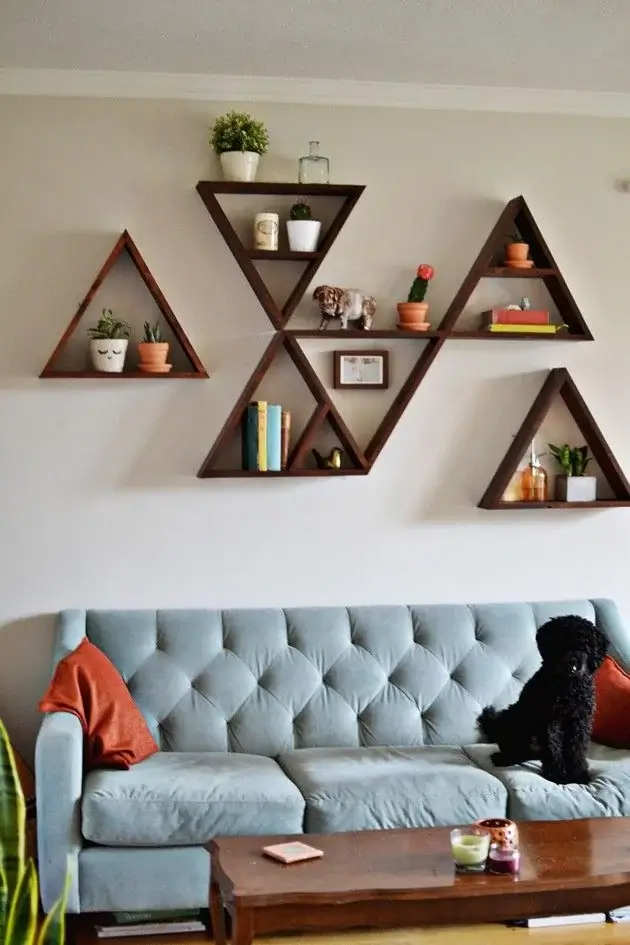
Standard rectangular shelves are fine. Triangle shelves arranged in an overlapping asymmetric cluster are a whole other vibe that rectangular shelves simply cannot compete with.
Reddit user r/myhousedesigns123 built five dark walnut-stained triangle shelves of varying sizes and mounted them in an asymmetric arrangement above a powder-blue tufted sofa. Some triangles point up, some point down, and where they overlap, the negative space creates additional shapes. Each shelf holds just a few small objects, including succulents, a cactus, colorful books, and one small framed photo.
The arrangement clearly got planned on the floor before a single nail went in. You can see the thought process in how the triangles almost tile together without quite completing the pattern. That deliberate incompleteness creates visual tension that keeps your eye moving around the whole piece.
Building these yourself requires:
- Miter cuts at 60-degree angles on 1×4 lumber
- Wood glue and pocket screws at the corners
- Dark walnut stain and standard wall anchors for mounting
- Varying the sizes (same-size triangles would completely flatten the effect)
For styling, keep it minimal. Three items maximum per shelf. The geometric shapes need room to breathe, not to get buried under stuff.
DIY Indoor Living Plant Wall That Transforms an Entire Room
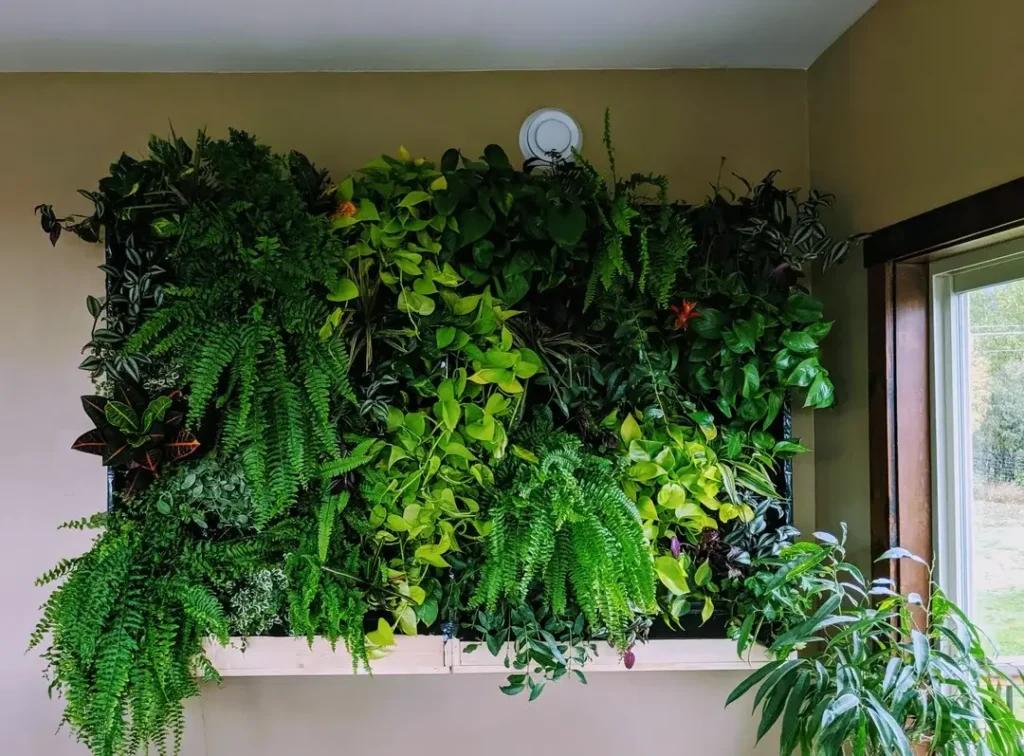
A plant on a shelf is nice. A floor-to-ceiling wall of living plants is a completely different experience. It changes the air, the light, and honestly the whole energy of a space.
Reddit user r/hillsroch built a wall-mounted planter system using a horizontal wooden frame fitted with staggered pocket planters. The result is a dense cascade of Boston ferns, golden pothos, tradescantia, crotons, and other tropical varieties spilling downward in overlapping layers. The texture difference between feathery ferns and broad-leafed pothos creates depth that a single plant variety never could.
This style is called a living wall or vertical garden. The DIY version typically uses a wooden frame with fabric or plastic pocket inserts (Woolly Pocket pouches work well). The frame mounts to the wall with heavy-duty anchors, and plants go into the pockets with potting mix.
Here’s the thing most people miss when planning one of these:
- Watering logistics matter more than aesthetics. Without a plan, a wall this size becomes a twice-weekly nightmare
- A drip irrigation system routed through the frame makes it totally manageable
- Position it near a window for natural light, which this creator did smartly
No artwork you buy ever replicates what a living wall does to a room. It moves with air currents, shifts with seasons, and creates the kind of organic calm that manufactured decor just can’t fake.
Densely Layered Yarn and Embroidery Textile Wall Hanging
This is the kind of piece that makes people stop mid-conversation to look more closely. Seriously, the detail is almost impossible to take in all at once.
Reddit user r/natalielovestocreate created a large-scale textile wall hanging on a white linen backing, covering the entire surface in embroidered and yarn-worked florals. There’s a large red daisy with a mustard-yellow French knot center, a navy chrysanthemum in chevron stitch, orange sunflowers, purple anemones, and dozens of yarn pompoms in deep navy, mustard, and sage filling every single inch.
What sets this apart from typical yarn wall hangings is the total commitment to fullness. There is not one empty square inch on that canvas. That density creates a richness that feels more like a painting than a textile.
The techniques involved include:
- Satin stitch and long-and-short stitch for flat floral areas
- French knots and crochet bobbles for dimensional centers
- Yarn pompoms made with a cardboard pompom maker
None of these are especially advanced in isolation. The real skill is combining them with intention across a large surface. If this project appeals to you, start with a 12×12 inch canvas and one flower. Work outward from there instead of trying to plan the whole composition upfront. The organic quality of this piece comes from responding to what’s already on the canvas.
DIY Slatted Wood TV Feature Wall That Changes the Whole Room
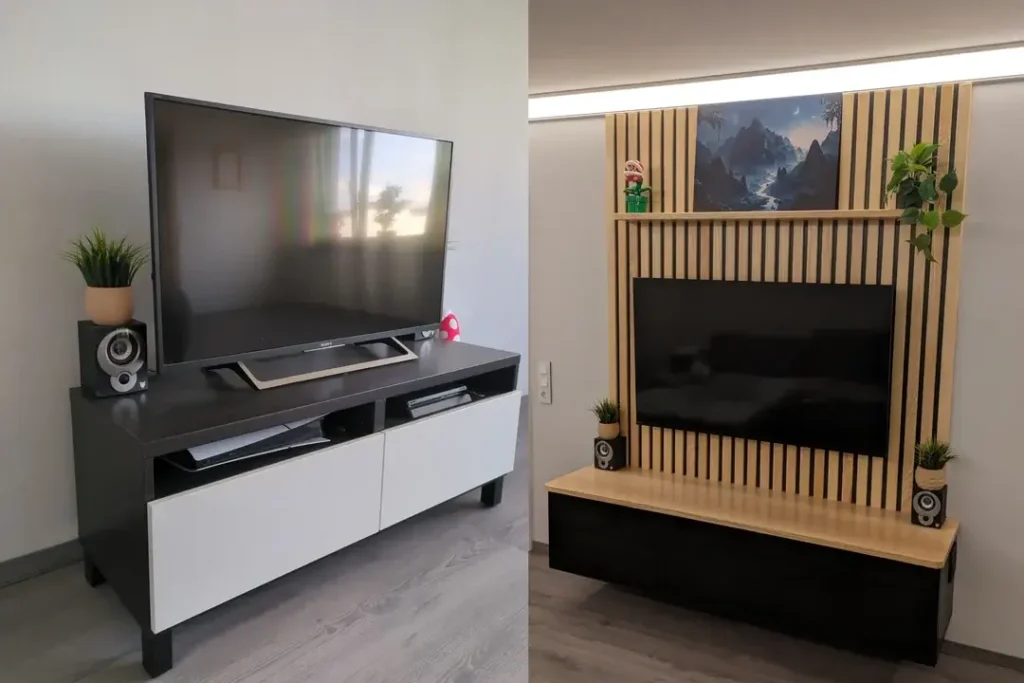
Before-and-after photos can be deeply misleading. This one is not. The transformation here is genuinely dramatic.
Reddit user r/iBeryl documented the change from a basic black-and-white IKEA Besta TV stand sitting in a plain corner to a full DIY feature wall built from vertical wood slats. The finished result shows evenly spaced natural oak-toned slats running floor to ceiling on a dark backing panel, with a floating black shelf at mid-height holding a wall-mounted TV. LED strip lighting runs along the ceiling, casting a warm upward glow, and small potted trailing plants flank the sides.
The slats are everything here. The technique uses standard 1×2 or 1×3 lumber cut to equal lengths, painted or stained to preference, and mounted vertically onto a painted MDF backing board with consistent spacing. The backing board mounts to the wall, so the slats never touch the drywall directly. This makes the whole unit easier to remove later if needed.
What makes this build especially smart is the shelf height placement:
- TV sits at roughly eye level for someone seated
- Space above holds artwork
- Warm LED strip at the ceiling prevents the top from feeling too heavy
This is a weekend project for someone comfortable with a miter saw, and the material cost is pretty modest since you’re mostly paying for lumber, paint, and mounting hardware.
3D Paper Butterfly Corner Installation with Moody Lighting
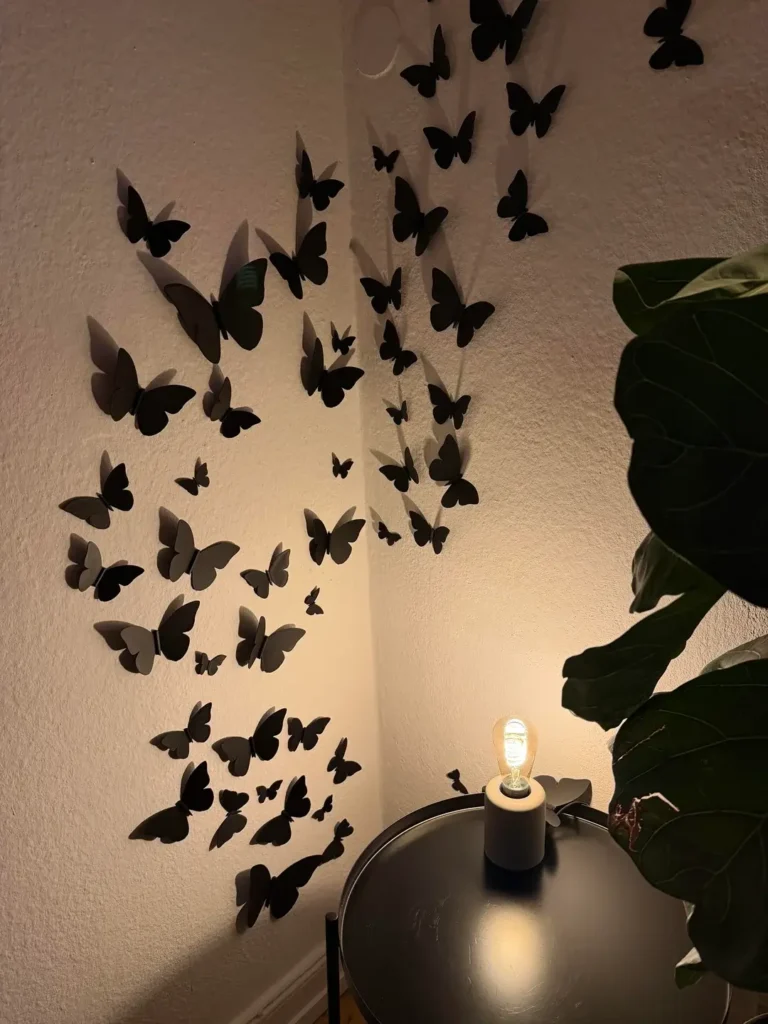
Butterflies on walls have been done before. This version earns attention through scale, placement, and light.
Butterflies on walls have been done before. This version earns its attention through scale, smart placement, and great lighting.
Reddit user r/Remote_Cabinet2910 cut and folded dozens of matte black paper butterflies in multiple sizes, ranging from about 2 inches to 5 inches across, and mounted them across a wall corner using adhesive dots. Each butterfly is folded at its center so the wings lift away from the wall at an angle, creating real shadows. An Edison-style lamp below provides warm amber light that projects those shadows upward.
The corner placement is genuinely clever. Most people treat corners as dead space. Running the installation from one wall to the adjacent one makes the corner itself part of the composition. The swarm effect, denser in some spots and scattered in others, mimics how actual butterflies move. That’s why it reads as organic rather than patterned.
To make these yourself:
- Trace butterfly shapes onto card stock (not regular printer paper, it folds too softly)
- Cut with scissors or a craft knife
- Make a sharp crease along the centerline to control how much the wings lift
- Use adhesive dots to mount them at varying angles
The lamp underneath is not optional if you want the shadow effect. Without directional light, the butterflies just become flat black shapes. The lamp transforms the whole installation into something that shifts and changes as light moves throughout the day.
Also Read; 8 Mirror Wall Decor Ideas That Actually Make Your Space Look Bigger (With Real Examples)
Paper Straw Grid Wall Art with Rolled Paper Roses
There’s something deeply satisfying about a project that turns throwaway materials into something that genuinely looks good. 😊
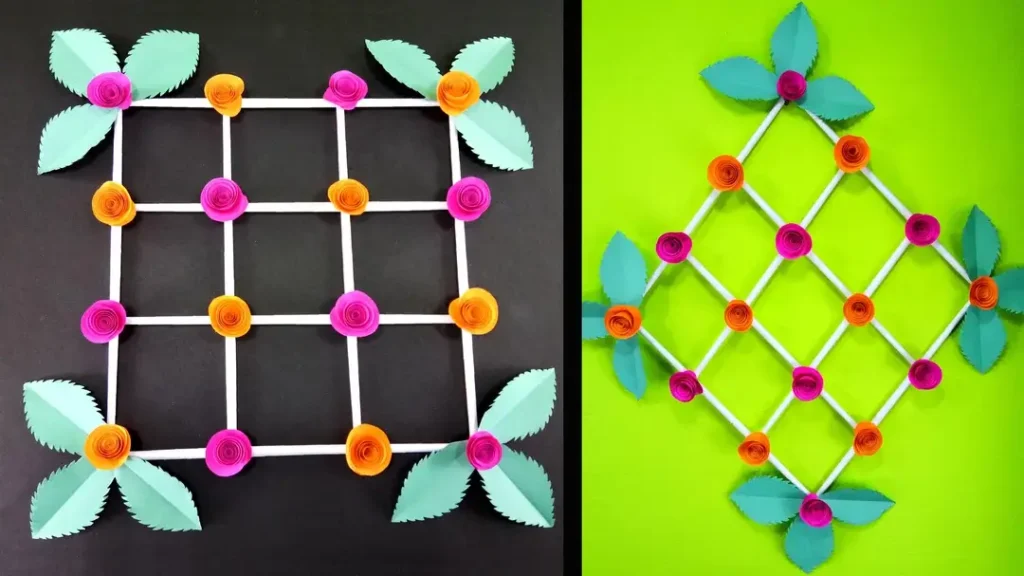
Reddit user r/asworld7 built two versions of a geometric grid wall hanging using white paper straws as the structural framework, with small rolled paper roses in hot pink and orange placed at each intersection. Teal-green paper leaves with serrated edges extend from the corner intersections. One version is oriented as a square, the other as a diamond rotated 45 degrees.
The grid is built by gluing paper straws at right angles to create a 4×4 or 5×5 lattice. The roses use the classic rolled-strip method. Cut a spiral from a square piece of paper, roll it from the outside edge inward, let it open slightly, then glue the base. At about 1.5 to 2 inches in diameter, each rose takes around three minutes once you get the hang of it.
This is one of the strongest beginner DIY wall decor ideas out there because:
- Every material is available at a dollar store
- Total cost is typically under five dollars
- The finished piece can fill a 12×12 to 18×18 inch space effectively
- The two-tone color scheme (alternating pink and orange) keeps it from looking monotonous
FYI, if you go monochromatic instead, the grid structure visually dominates over the florals. That produces a completely different look, but it works just as well depending on your space.
James Webb Space Telescope Mirror Replica Wall Art
This is the most specific and technically committed piece in the entire list, and it might honestly be the best one.
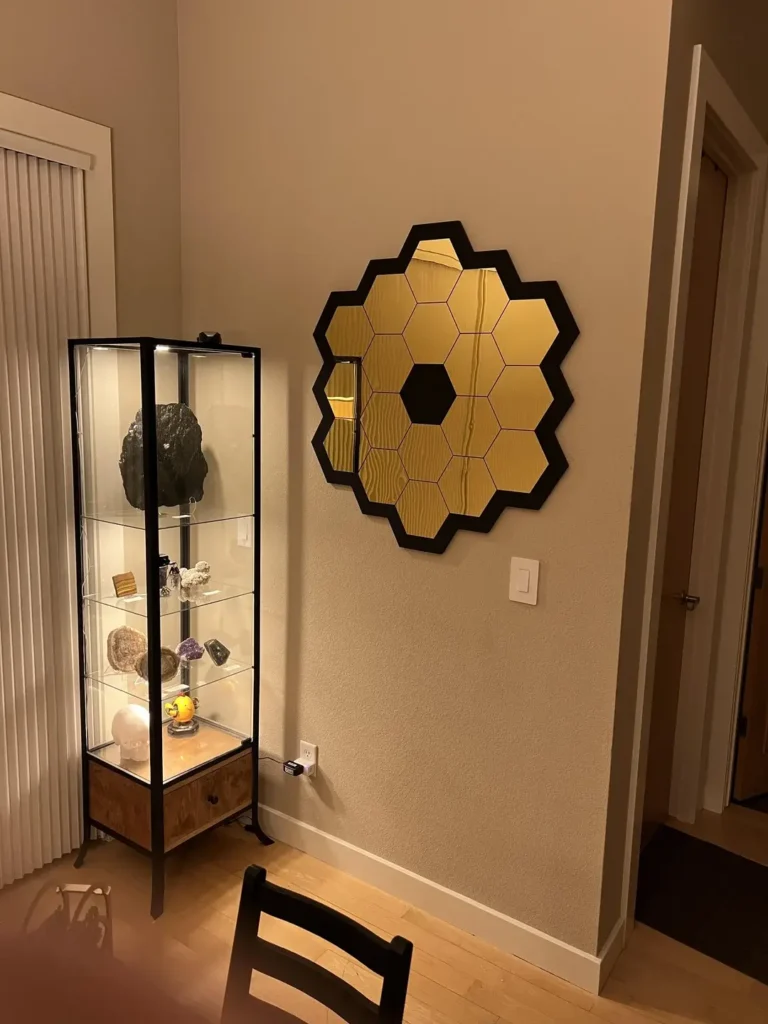
Reddit user r/ryankrameretc built a wall-mounted replica of the James Webb Space Telescope’s primary mirror array, the iconic honeycomb configuration of 18 hexagonal gold mirror segments arranged around a central dark hexagon. The piece is roughly 24 to 30 inches across, constructed from individual hexagonal mirror tiles mounted onto a dark backing cut to the outer profile of the telescope’s array. It hangs on a warm-toned wall next to a lit display cabinet filled with minerals, crystals, and a meteorite.
The gold tint on the hexagonal mirrors matches the beryllium-coated gold of the actual JWST mirrors closely enough to make the reference immediately clear. And here’s what makes it genuinely clever: it works as a functional mirror AND as a science reference at the same time. It reflects light, makes the space feel larger, and communicates something specific about the person who made it.
The best personal decor always does that last part.
To build something similar:
Mount with appropriate wall anchors based on the total weight
Source pre-cut hexagonal mirror tiles from craft suppliers, or cut your own
Cut the backing from MDF or plywood using a jigsaw following the JWST mirror outer contour
Paint or cover the central hexagon dark to match the telescope’s design
Quick Comparison: Which DIY Wall Decor Idea Is Right for You?
| Project | Skill Level | Approx. Cost | Time to Complete | Best Room |
|---|---|---|---|---|
| Paper Hexagon Flower Hanging | Beginner | Under $5 | 2–3 hours | Bedroom, nursery |
| Fandom Circle Wall Display | Beginner | $10–$30 | 1–2 hours | Living room, office |
| Vinyl Record Ledge Wall | Beginner | $30–$60 | Half day | Living room |
| Triangle Geometric Shelves | Intermediate | $40–$80 | Full weekend | Living room |
| Living Plant Wall | Intermediate | $80–$150 | Full weekend + ongoing | Kitchen, living room |
| Yarn and Embroidery Textile | Advanced | $20–$50 | Several weeks | Bedroom, studio |
| Slatted Wood TV Feature Wall | Intermediate | $60–$120 | Full weekend | Living room |
| 3D Paper Butterfly Corner | Beginner | Under $10 | 3–4 hours | Bedroom, hallway |
| Paper Straw Rose Grid | Beginner | Under $5 | 2–3 hours | Any room |
| JWST Mirror Replica | Intermediate | $30–$70 | Full day | Hallway, living room |
Stop Planning and Actually Make Something
Here’s what every single one of these 10 projects has in common. Someone actually made them. Not saved them to a Pinterest board. Not added supplies to a cart they never checked out. They picked up materials and started.
The wall you actually finish will always be better than the one you keep planning.
If you’re just starting out with DIY wall decor ideas, I’d suggest picking one of these three first:
- The paper straw rose grid (cheap, fast, and forgiving)
- The 3D paper butterfly installation (impressive results for almost no money)
- The paper hexagon flower hanging (great beginner project with a big visual payoff)
If you’re ready for something with more permanence, the slatted TV feature wall or the triangle shelves will genuinely change how a room feels in ways that simpler projects can’t match.
One approach that consistently works? Pick one wall and commit to it. Not every wall in your home, not a whole-room overhaul. Just one wall. The focus that forces tends to produce way better results than spreading effort thinly everywhere.
So, which one are you trying first? 👀
